Welcome to mariaelectricals.com. In this tutorial, you will learn how to wire a single pole light switch, and dimmer switches.
Though it is the work of a licensed electrician to wire a house and switch boxes, you as a homeowner can still do some simple installations such as light switch wiring.
Wiring a light switch is one of the easiest things in electrical work, especially a single-pole switch wiring. But for non-electricians, it’s always hard.
Below is a guide and diagram to show you how to connect a light switch in your domestic and residential homes.
How a single pole light switch works
The standard single pole light switch is the simplest form of a light switch you can see in any building. It usually comes with two screw terminals and a ground screw.
The first screw is where to connect the hot wire from the power source, the second screw terminal is for another hot wire called the switch leg that runs from the switch to the light fixture.
When the switch is ON, the current flows through the switch leg to the bulbs and illuminates the house.
The ground screw is where you connect the ground wire that helps to send excess electricity to the ground if there is a power surge, or short circuits.
Tools and materials required for light switch wiring.
- Screwdriver
- Needle nose plier
- Wire stripper
- Utility knife
Materials
- Single pole light switch
- 14/2 gauge wire
- Wire nuts.
- Black electrical tape
Note: Before you work on electricity, always turn OFF the circuit breaker, and also wear your safety hand glove.
How to wire a single pole light switch
Wiring a light switch is an easy task if you have the basic wiring tips. But if you are new to it, better call an electrician.
If you are to install a new light switch in your home, you will need to run a cable from a 15 amp breaker in your electrical panel to the switch metal box.
Once you have run the cable to the electrical box, installing a new switch or replacing an old one takes the same process
Here are the steps to wire a single pole light switch:
Step 1: Turn off the branch breaker
Before you work on electricity, always switch off the breaker that controls the light.
This is to rule out the chances of electric shock during the installation.
You should also put on your personal protective equipment (PPE) such as your safety glove, boot, and equally work with insulated tools.
Step 2: Remove the switch plate and switch
Using your screwdriver, remove the screws holding the cover plate and gently pull out the switch from the electrical box.
Step 3: Identify the wires
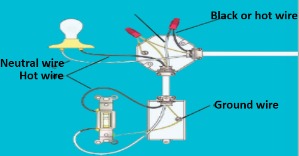
In a standard light switch setup, there are always three wires.
- Black or red wire: This is the hot wire that carries electricity from the breaker panel to the switch.
- White wire: This is a neutral wire. Though not connected to the switch, it helps to complete the circuit by allowing the current to flow back to the breaker box.
- Green or bare copper wire: This is the ground wire that protects you from electric shock.
Step 4: Disconnect the switch wiring
Using a screwdriver, remove the screws holding the wires and remove the switch. Inspect the coiled wires to make sure they are still strong else, you cut them and bend another round hook.
Step 5: Connect the wires to the new light switch
- Connect the black or red hot wire from the power source to one of the screw terminals on the switch.
- Join the white neutral wire from the source to the neutral going to the light fixture.
- Join the two earth wires and also connect them to the earth terminal screw of the switch
- Also, connect the black or hot wire from your light fixture to the second brown terminal to complete the wiring.
Step 6: Push the wires back into the electrical box
Carefully tack the wires back into the electrical box to make sure they are not pinched or hooked.
Step 7: Put back the light switch and cover plate
Put the switch into the electrical box and tighten it with screws. Cover it with a switch plate and tighten the screws with a screwdriver.
Step 8: Turn ON the power and test the switch
Turn ON the breaker that controls the branch circuit and test your installation. The light should turn ON and OFF when you flip the switch.
Light switch wiring diagrams
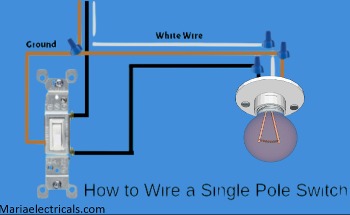
There are different ways of wiring a single pole light switch but all depend on the position of the switch along the circuit. Here are the major wiring diagrams.
Light and switch wiring diagrams when light is at the center of the circuit.
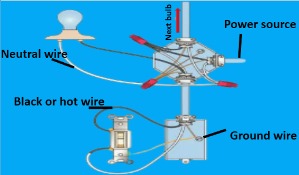
Wiring diagram when the source goes to an additional un-switched light.
How to install a dimmer switch
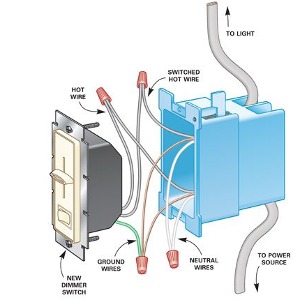
Dimmer installation is quite easy, it is like single-pole wiring. Dimmers usually come with three short wires, two blacks, and one earth wire.
Installation procedures
Before any installation, check the power rating of the dimmer you buy. Most of them can handle up to 600 watts.
Check the wattage of your bulbs and make sure you did not overload the dimmer.
Note: Dimmer switches don’t work on most fluorescent and LED bulbs. These lights require low-voltage dimmers.
Here are the steps to follow.
- Turn OFF the power from your electrical panel
- Unscrew the switch plate and also check the circuit with voltage tester to make sure it is dead.
- Lose the switch from the switch box and pull it out.
- Disconnect the old wires from the switch and connect the dimmer.
- Use the connectors that come with the fixtures to connect the wires, respectively.
Frequently Asked Questions
Does it matter which wire goes where on a smart light switch?
No, it does not matter provided it is a single-pole switch with two terminals. The light switch doesn’t have neutral terminals, it’s all hot wires from the supply and then to the bulb.
Related articles
- How to wire three-way switches
- How to wire a 4- way switch.
- How to wire a Circuit Breaker Box
- Double-Pole Switch: Types and How to Wire the Toggle Switch.
- How to Wire a 220v Plug with 4 Wires
- Doorbell Wiring Diagrams: Learn How to install a doorbell Transformer, Chime, and Push Button
- How to Replace a Bad Circuit Breaker
- LED Ceiling Lights Fixtures for your Home.