As an electricity user, it is your duty to make sure your house earthing system is proper. This is to prevent electric shock and other hazards.
House earthing or grounding connects the earth wires of every outlet to the ground, and whenever there is a short circuit or power surge, it flows through the earth rod to the ground.
The National Electric Code recommends proper earthing on every new building during electrical installation, and old ones to be earthed during a renovation.
An electrician can easily tell if your house has a good earthing and bonding system.
Benefits of house earthing and bonding
Earthing is necessary because it helps in the following ways:
- Earthing prevents electric shock by providing a path (protective conductor) which carries the fault currents to the ground.
- It protects electrical appliances from damage arising from faulty currents.
- Prevent the risk of fire outbreaks that may arise from current leakage.
- It maintains a stable voltage in three-phase circuits of an electrical system, even when the load is unstable.
- Bonding protects electrical equipment from potential differences that can lead to rusting, degradation, or malfunction.
How earthing worK
During house wiring, we usually connect earthing wires from all the outlets to earth links on the distribution board (DB).
From the DB, we connect them to the earth plate.
Whenever there is circuit overload or power surge, current flows through the earth rod to the ground.
House earthing protects you from electrocution by providing a conductive plate which carries the faulty current to the ground.
Earthing also causes our protective devices such as fuses or circuit breakers to switch off the current that goes to the faulty circuit.
Types of Earthing
There are three types of earthing, they include:
- Pipe
- Plate
- Strip
Pipe earthing: this is the cheapest and most efficient method of earthing a house. All you will need is a galvanized pipe which will be buried vertically into the ground to work as an earthing electrode.
Plate earthing: In this type, a plate made of G.I. (galvanized iron), or copper rod, is buried into the ground at a depth of about 3 metres from the ground level. This copper plate is buried in an alternative layer of salt and coke.
Strip or wire earthing: In this method, strip electrodes of about 25 mm x 1.6 mm are buried in horizontal trenches at a depth of about 0.5 m.
House earthing requirement
Electrical grounding requires the following materials:
- Earthing rod.
- Earthing wire.
- Industrial salt.
- Charcoal.
- Earth link.
- Tools.
Earthing rod
The earthing rod has the following features:
- A diameter of 20mm.
- Length of 1500mm.
- An adjustable clamp at the top.
- One conical end structure.
2. Earthing Wire:
Earthing Wires are made of either copper or galvanised iron.
Features of earthing wires
- Excellent conductor.
- Resistant to corrosion
- High tensile strength.
Industrial salt and charcoal
Salt and charcoal are excellent conductors of electricity. They also contain ions and carbon that enhance their conductivity
3. Earthing Tools:
They include spanners and pliers to adjust the clamp
A continuity tester to test for continuity.
Other tools you may need include a shovel, digger, or excavating machine. The earthing pit dimension should be 150cm x 150 cm x 300 cm.
House earthing procedures
To make sure that your home’s grounding system is correct, you must follow these steps:
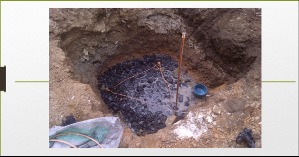
1. Dig a pit
Dig a pit about 3 meters deep around your house. This is where you will bury the galvanized iron (GI) or copper earthing rod.
2. Improve soil conductivity
Improve the soil conductivity by filling the bottom of the pit with a layer of salt, charcoal or earthing compound.
3. Place the earthing rod
Drive the GI or earthing rod deep into the pit, leaving about 25cm above the ground level.
4. Connect the earthing wires
Connect the earthing link and the electrode using the earth wire.
Adjust the clamp using the spanner and plier.
Once done with the connection, test for continuity using the continuity tester.
How to check if your house is properly earthed
It is important you know how to check if a house is earthed, and also if it works properly. Although the National Electric Code recommends earthing on every house, older homes may not have it.
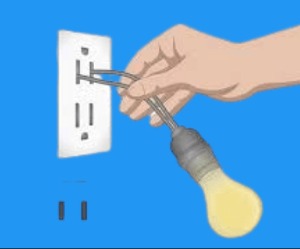
To check if your house is earthed, use a test lamp, or a multimeter.
To use a test lamp, plug the wires from the lamp into the positive and negative ports of the outlets or socket.
The positive port of the socket should be the right hole, while the negative should be the left hole. ON the switch, the bulb will glow brightly.
Remove the negative wire and insert it into the earthing port of the socket (the top hole).
The bulb should glow brightly as before. If it does not glow, it means there is no earthing in the house. But if the bulb glows and dims, it means that the earthing is faulty.
How to check if a house is earthed using a multimeter.
A multimeter is more accurate when checking the earthing of a house, and you can use them on both alternate current (AC) and direct current (DC).
To check for AC current, move the pointer of the multimeter to AC value. The same applies to DC. You can move the pointer to DC value.
Attach the red probe to the port labelled “V”, “Ω,” or “+”, and the black probe on the port labelled “COM” or “-”.
Insert the red probe on the positive hole, and the black on the negative hole. Check and write the value.
Remove the black probe and insert it into the earthing hole of the socket. Observe the value. It must tally with the earlier value or close to zero.
If there is huge difference, know that the earthing is faulty.
What happens if a house is not earthed?
If a house is not earthed, people may get electrocuted whenever there is a power surge. It may also damage appliances and sometimes cause a fire outbreak.
Related articles: