Looking to install a new doorbell at your front door? Our doorbell wiring guide is here to help you.
Doorbells play security roles in our homes, and every homeowner suppose to have one.
This article will guide you on how to wire a doorbell perfectly even as a first timer
There are three types of doorbells:
- Wired
- Wireless (battery operated)
- WI-FI models.
Wireless doorbells don’t need wiring, they are battery powered.
All you can do is to mount the bell button at the door, and plug-in the chime to a socket.
Wi-Fi bells are linked to your home router with or without a wire.
If you are yet to buy the doorbell, get it here at Amazon
Parts of the doorbell
They have three key parts, including:
- The transformer
- Chimes
- Doorbell button.
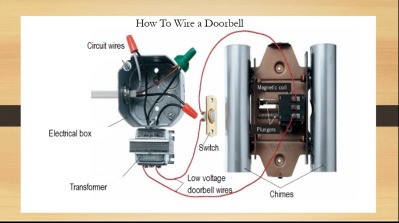
The transformer
Normally, during wiring, we don’t connect the doorbell directly to the current.
It is first connected to the transformer, and then to the circuit that supplies power to the doorbell.
The role of the transformer is to step-down the household current from 120V to about 8 to 24V required by a bell.
You can mount the transformer anywhere in your house, but most electricians connect it on the electrical panel or inside the circuit breaker.
Related post: How to find a doorbell transformer box
The doorbell chimes
The chime is part of the doorbell system that houses the buzzer or the bell. It is the part that rings whenever you push the button.
Doorbell button
The push button is connected at the front door, and when pressed, the chime rings.
Tools and materials required for doorbell wiring
The following tools are necessary for doorbell installation.
- Multimeter.
- Power drill.
- Small level or plum.
- Toggle bolts.
- Wire.
- Pencil.
- Wire stripper
- Screwdriver
- Fish tape
- Cello tape.
- Doorbell kit
How to wire a doorbell transformer, chime, and push buttons.
To wire the doorbell correctly, follow these steps:
Locate the power source
Look for where you will connect the transformer, preferably at the junction box. But before connecting, use your multimeter to confirm the circuit has continuous power and is not controlled by a switch. Else, it will affect your doorbell when the switch is off.
Turn off the power supply
It is necessary you shut off the power supply from your circuit breaker before connecting the transformer to avoid electric shock.
Install and connect the doorbell transformer.
Mount the doorbell transformer at the junction box and make the connections.
Attach the wires from the transformer, black, green and white, to the corresponding black, white and green wires from the power source and secure them with wire nuts.
The bottom of the transformer usually comes with two screw terminals for wire connection.
Insert the wires and connect one wire to the screw of the chime, and the second one to the push button, before connecting it to the chime.
Related post: How to test a doorbell transformer
Mount and install the doorbell chime
Position the chime at your desired location on the wall and plumb it to a level. Using a pencil, mark the location of the mounting holes on the wall.
Fix the buzzer or bell on the wall using toggle bolts often included in the doorbell kit.
Mount the doorbell push button or switch
Map out a place near the front door and install the push button. Once you are through, test the doorbell to make sure it works properly. You can do that by pressing the doorbell button.
Doorbell wiring diagrams
Below are common wiring diagrams involving a doorbell transformer, single to double chimes and push-buttons.
Wiring involving a single chime and button.
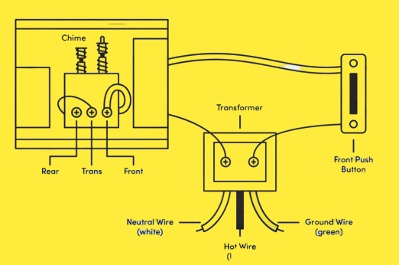
This is the most common wiring system you can see. It comprises a single bell button connected to a chime and a transformer.
Wiring involving a chime and two buttons
This setup has a single chime and two buttons. You can go for the wiring system if you need two buttons, maybe at the front and your back door.
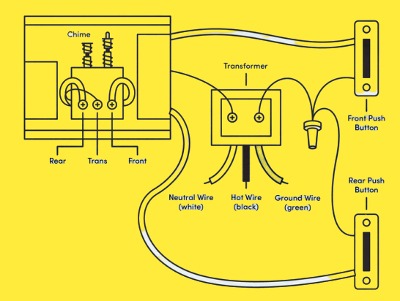
Wiring diagram involving two chimes and a push button
This smart bell has one button and two chimes. You can go for the wiring system if you want the bell ring to be heard in all parts of the house.
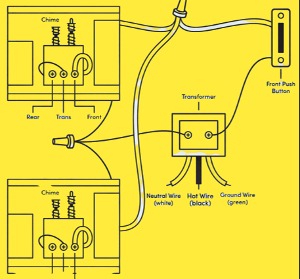
Smart Doorbell with two chimes and two door buttons
This doorbell installation has two buttons and two chimes.
You can set up the system if you want doorbells at both doors of your house, and if you want to hear the buzzer ring loudly in different locations of your house.
Need a doorbell expert? Please contact mariaelectricals
If you don’t have enough experience to install the smart doorbell, contact a licensed electrician to help you with the installation.
FAQ
1. Can doorbell wire shock you?
No, it cannot. The wires are of low voltage, about 18 – 20 gauges and such cannot shock humans. However, the hard-wired transformer uses high voltage. So, always switch off your power supply before working on your doorbell.
2. how can I identify doorbell wires?
Identifying the doorbell wire is easy. They are usually small, about 18- 20 gauge and its wire often separate from high voltage wires.
3. How does a doorbell get power?
Each time you press a doorbell push button, you complete an electrical circuit. This allows currents to flow around the internal electromagnet of the doorbell, thus generating a magnetic field. The flux is then used to power the mechanism that rings the bell sound.
4. Can I wire a doorbell from the light switch?
No, wiring a bell from the switch can make it not to ring when the switch is OFF. However, you can remove the light switch box and install a larger 2 gang or junction box. Split the lines and use one for the switch, and the other for the doorbell.
Related articles