
If you’ve been using incandescent, or LED lights for a while, you might have noticed a shift from the old normal bulbs to LEDs. This shift is because LED lights are becoming more popular, durable, and affordable.
With their long lifespan of about five years, and energy saving properties, it’s not a surprise they are quickly replacing the old traditional bulbs.
As the demand for LEDs is constantly increasing, learning how to make your own LED bulb is never a bad idea.
This article will teach you how to make led bulbs.
What is an LED?
LED is an abbreviation for “light-emitting diode”. It is a semiconductor material that emits light when currents pass through it.
LED lights are normally used for office or decorative lighting, as they offer more benefits than the old normal bulbs.
They produce less heat, save more energy, and last very long. They also produce several lighting colors and other benefits. You will be missing a lot if you are not using LED bulbs.
But since a single LED can not illuminate a large space, a combination of LEDs is usually necessary.
They are fixed on the PCB and covered with housing.
What are the basic components of LEDs
LEDs comprise diode made from semiconductor materials. The semiconductors are made of a crystalline material that needs impurities to conduct electricity.
These impurities are added to the diode through the process of doping. The most commonly used impurities are nitrogen and zinc.
Diodes are powered through electrical wires. Most manufacturers use silver and gold compounds, as they can withstand heat and soldering.
Why should I be interested in bulb making?
LEDs are quickly becoming the new go-to light bulb. They have a lifetime of up to 50,000 hours and produce a vast amount of colors.
Knowing how to produce it will not only help you save money, it will also open a new business opportunity for you.
What materials are used to make the LED bulb?
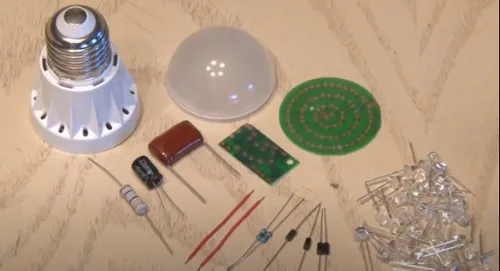
To produce an LED light, you need the following materials:
- Bunch of tiny LEDs
- Two types of capacitors
- One 20 ohm and “two” one ohm of resistors
- Four diodes
- Printed circuit board (PCB plate)
- Bulb casing.
- Led board
- Heat paste
- Soldering iron
- Soldering lead
How to produce LED bulbs
You can produce the LED bulb in two steps once you have the required materials.
- Build a power unit
- Mount the LEDs on the board and connect them.
Build the power unit
Collect the printed circuit board (PCB) and look at it. You will see the positions where to install the resistors, diodes, and capacitors.
Mount the 20-Ohm resistor
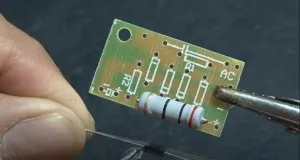
Mount the 20-ohm resistor on the PCB and solder it without minding the polarity.
Install the diodes

The PCB comes with positions where to install the diodes. Fix them at the designated points and solder them. The diodes allow current to flow only in one direction and that small line on the diode shows the direction of the current.
Mount the remaining two resistors

Insert the “two” one mega ohm resistors on the R1 and R2 positions on the PCB and solder them.
Install the capacitors
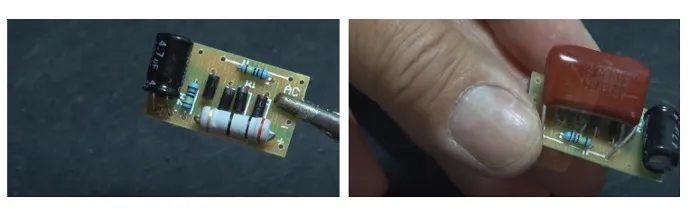
First, install the 4.7 µF capacitor. The longer leg is the positive, while the shorter leg is the negative.
Install the 1.8 micro-farad capacitor on the PCB and solder it without minding the polarity.
Attach positive and negative wires to the power unit.

Connect the power unit to the metal casing
Join the metal cup with the power unit and solder it. Make sure the connection is tight.
Mount the LEDs on the board
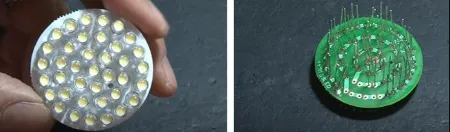
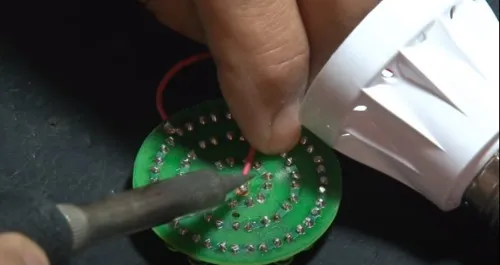
The board comes with small holes where you can insert the bulbs. Install the bulbs following the polarity signs on the board.
The longer leg of the bulb is the positive, while the shorter one is negative. Trim the LEDs once you are through and solder them.
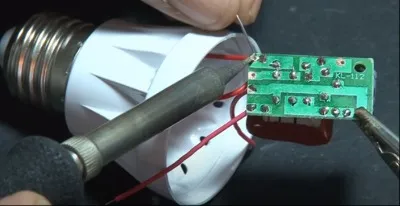
Connect the power unit to the LED board
After installing the LEDs on the board, connect the power unit and the LED board
And carefully package it in the bulb casing.
FAQ
How is LED different from incandescent bulbs?
LEDs differ from incandescent bulbs in the following ways:
LEDs have electrons that flow to generate photons (light) while the incandescent glows with filament.
LEDs emit light from only one direction, while old bulbs generate from all directions.
While LEDs emit little heats, incandescent emit about 90% of its energy as heat.
LEDs have a long life span compared to traditional bulbs.
Do LEDs save energy?
Yes, LEDs save more energy than filaments because diode lights require less energy to glow.
A bright LED flood lamp of 12 watts can light up an output equivalent to a 50 watt incandescent bulb.
If I replace my old bulbs with LEDs, what should I do with the old ones?
If you replace your old bulbs with LEDs, never throw them away instead, recycle them.
These old bulbs contain mercury vapor that can pollute the atmosphere when released into it.
Instead of throwing them away, gather them carefully at your local hazardous waste center.
LEDs don’t contain mercury and may be thrown away however, they are more useful to recycle them.
That’s it in my complete tutorial on how to produce an LED bulb. Hope this helps? Let me know your opinion in the comment section.
Related articles